3 Great Finish Options for Kitchen Tables
Tables have always been some of my favorite pieces of furniture to build. Having the opportunity to create a space where relationships are forged, memories are made, and friendships are formed is something that I truly love doing. I have made many tables over the years and have tried many different methods of finishing or sealing the table top. I have found the 3 best finishes for wood kitchen tables. All 3 products have specific purposes and will depend on the details of your kitchen table.
Sealing the surface of a wood kitchen table is so important in order to ensure many years of heavy use. I have tried MANY products over the years and narrowed it down to three main products. They each have their own specific use and reasons for when to use them.
There are a few factors that will need to be considered when choosing wood finishes for a table top. I will cover all of these in this article.
I will never recommend something that I have never used in my own home or my own furniture builds. So, everything I recommend to you has been tested and tried on many DIY projects. I’m leaving quite a few products out of this article because I have tried them and I don’t recommend them. I have unfortunately had to go through many poor-quality products. However, the upside is that I have narrowed down the question of which sealer is the best for a wood kitchen table to these three products.
Each product will have a specific use on a specific table top.
The first product I will cover is the best general option for wooden table that will be inside. Ideally, the table top will either be veneer, stained, or painted. The second option is perfect for outdoor tables. The third product is best for natural hardwoods or butcher-block tables. All three are a good choice when a couple factors are taken into account.
All of these factors play into which sealer you will eventually choose, so let’s take a deep dive into what the best finishes are for all of these options.
Option 1: Best General Sealer for Wood Kitchen Table
Disclaimer: This site contains product affiliate links. We may receive a commission if you make a purchase after clicking on one of these links.
I will start out with the best overall option for sealing a wood kitchen table. The best option is polyurethane matte finish.
This option is assuming the table will be used inside and is not a butcher-block or hardwood type table. The best option for this finish is for a painted, stained, or veneer kitchen table.
Personally, I do not like the look of a super glossy finish on a wood kitchen table. I think it takes away from the natural beauty of the wood grain. It also tends to show imperfections in the finish of the wood because it reflects light so much. Therefore, I love this finish because it has the perfect sheen. I much prefer a matte finish. This matte sheen will allow the beautiful wood to be seen much easier, with less of a reflection.
Oftentimes, people choose a gloss or semi-gloss finish for tabletops. This is generally because clean-up is easier the glossier the finish is. However, this particular matte finish has been incredible on our kitchen table as far as cleaning and wiping down goes. I sealed ours with this years ago and clean up has been very easy ever since.
This finish also seals out the water very well. We have never had water damage, even though water has been left on the surface for an extended amount of time. It simply wipes up with no residual marks. Oftentimes, water left on the surface of sealed wood creates a cloudy ring. However, this polyurethane prevents water spots very well.
Our wood kitchen table gets heavy daily use. I wipe it down every day with a microfiber cloth and it always cleans up very nicely.
I used this sealer for a recent mudroom hall tree build, a pull out drawer added to existing kitchen cabinets, black painted dresser, and rustic square coffee table and the finish has held up beautifully. This finish would even look great on stain-grade custom kitchen cabinets that you would like to keep the natural wood look on. Check out tips for how to seal furniture pieces that you paint with the best black paint color!
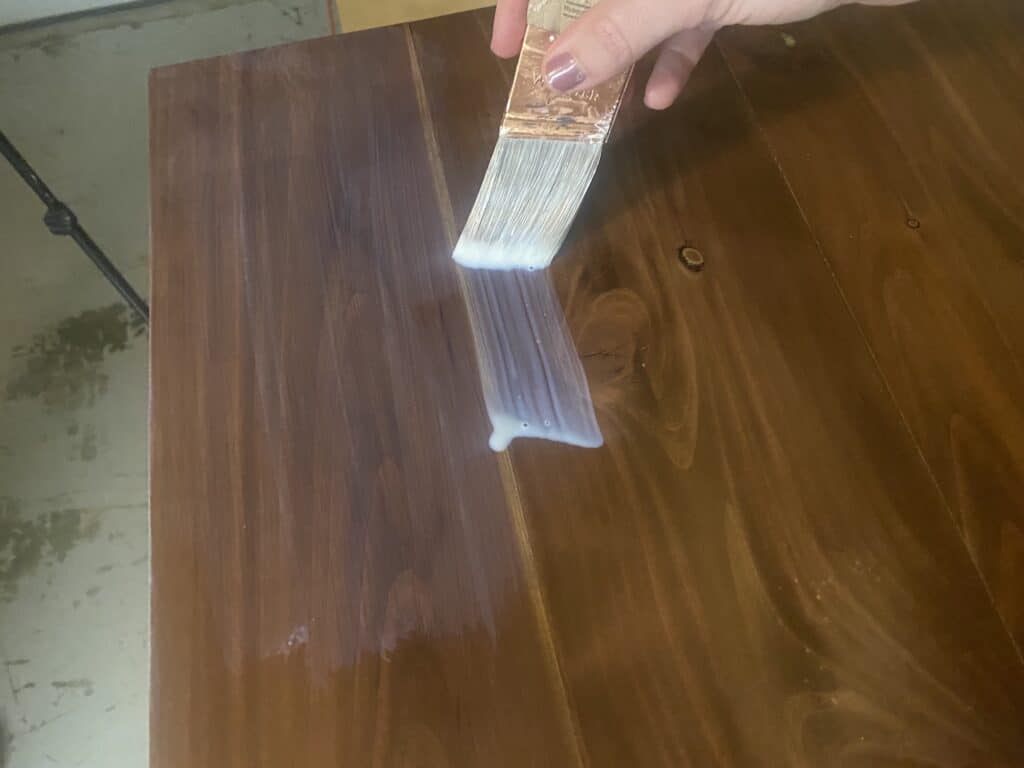
As a point of reference, this kitchen table has a wood veneer top. We bought it new from a local furniture store, and within a couple of weeks, the top began to almost immediately chip and show wear. I knew I could create a more durably finish on the top, so I eventually stripped the top down to the raw wood veneer. After a light sanding, I applied a stain, then this polyurethane sealer. In the end, I added 3 coats to the top. It has been incredible ever since!
How to Apply a Finish to a Wood Kitchen Table
I go into great detail about how to achieve a smooth paint finish on things like bookshelves in this post, so be sure to check it out. The process mentioned in that post applies to adding a polyurethane sealer to a wood dining table as well, like mentioned in this post.
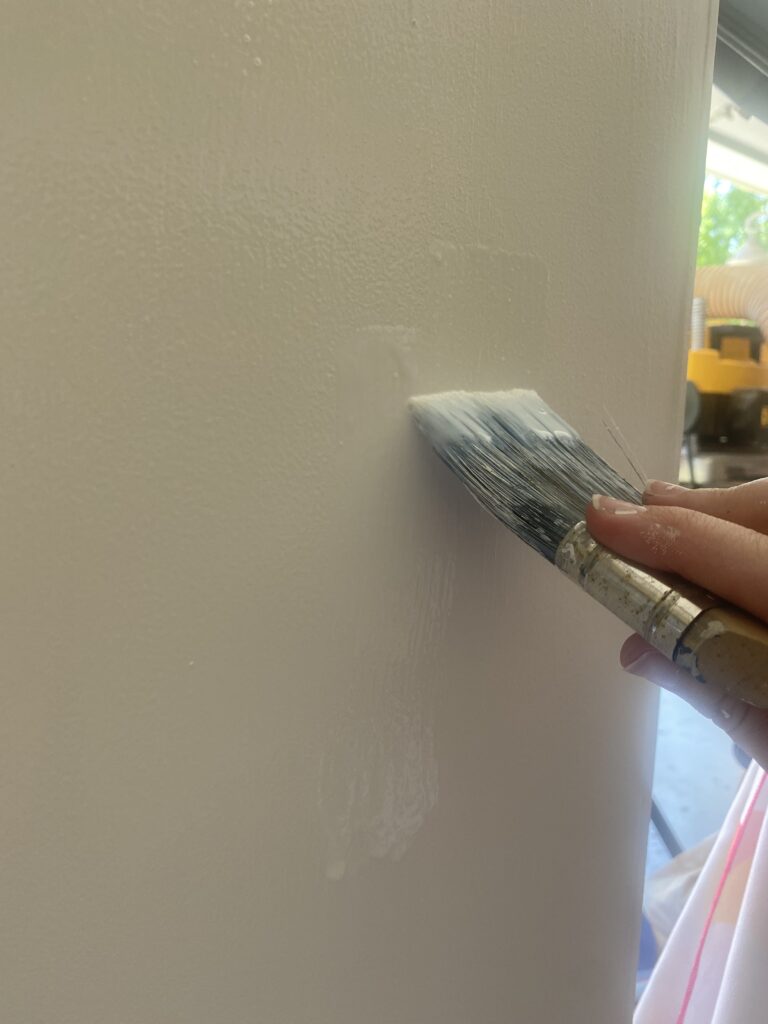
Before you apply the finish, be sure to never shake a can of sealer like this. By shaking it, you would cause air bubbles to form, which will not give you a smooth finish. Instead, use a stir stick to stir the finish before use. This will result in the smoothest application possible.
Use an Angled Natural Bristle Brush to Apply the Finish to the Wood Kitchen Table
To apply the sealer, use a quality angle natural bristle brush, according to the back of the can. I initially made the mistake of using an old paint brush that had been used for white paint in the project beforehand. The polyurethane finish caused bits of old white paint to flake off from the paintbrush into the sealer as I was applying it. It caused such a huge mess.
So, learn from my mistake and use a new, clean, quality angled natural bristle brush when applying the polyurethane to your kitchen table!
The finish will go on milky, however it dries crystal clear.
You can also use a foam brush for this step, however, the result will be a smoother finish if you use a paint brush.
Apply Multiple Thin Coats
It is best practice to apply multiple thin coats of the sealer in order to achieve the best results. Evenly coat the whole wood surface, however do not apply too much. By applying too much, there could be puddling, which could result in brush strokes in the finish.
Be sure to allow each layer of polyurethane to fully cure before adding another layer. Allow for ample dry time. Double check the back of the can for dry times. Although the finish will feel dry to the touch, consult the back of the can for full dry times.
There is ample work time when applying this finish to a dining room table. I love that aspect of this finish because it helps to cut down on brush strokes. You have time to smooth the finish while applying.
By applying thin coats, you can have time to evenly distribute the right finish over the table because of the ample work time. You will end up with a very smooth surface and a perfect finish.
It also doesn’t have a strong odor when applying it. However you should always take care to apply a finish like this with good ventilation and wear a mask. Once dry, it has no odor at all. Occasionally, finishes like this can have a rubber-y smell, but this one has none, which is a huge benefit.
Durability
This finish is also incredibly durable. As I mentioned before, this table gets very heavy daily use. It is a homework spot, a family game spot, a grocery drop spot, and an eating spot (multiple times a day!). There has never once been a scratch on the finish. For it not being a semi-gloss or gloss finish, it is incredibly durable. This sealer creates a very strong protective coating on the wood kitchen table.
Although I have never had this issue with this finish, if you ever find a steam stain on your table, check out this post on how to get steam stains out of wood tables.
How to Get Stains off of a Kitchen Table
My daughter once drew a picture on a sheet of paper with a Sharpie marker, forgetting about the bleed through onto the table. Our newly sealed table had permanent marker all over it.
However, this finish made it so simple to remove! All I did to remove the permanent marker from the kitchen table top was to use rubbing alcohol and a microfiber or tack cloth. After a little scrubbing, it came off in no time at all.
Afterward, I did have to brush on a thin layer of the polyurethane finish to even out the top coat on the table, but that was no big deal. I only had to do this on the spot that I wiped down that had a permanent marker, not the whole table. Because of the thin layers, it dried very quickly and we could use the table again quickly.
No Yellowing in the Finish
One other thing I love about this finish is that it never yellows. It is water-based, so the chance of it yellowing is greatly reduced verses that of an oil based finish. I have ruined more than 1 furniture piece by unknowingly applying oil finishes to the top, only to have it yellow over time. Although an oil-based glossy finish will be very durable, it won’t stand the test of time and will eventually yellow.
Once it yellows, the surface will need to be stripped and re-stained. No one has time for that! If I am going to take the time to apply a sealer to a piece of furniture like a kitchen table, I fully expect it to last a long time. This particular sealer on our kitchen table is going on 4 years of heavy use from my family and I have zero complaints about it.
Apply the Finish Over Paint or Stain
This finish looks beautiful over a wood stain, however, it can also be used over a painted kitchen table.
I have also used this product on the mudroom hall tree build I did. Applying a sealer over painted white cabinets is always nerve-wracking because the white paint will show any yellowing over time. I am fully confident that this sealer will not yellow and will preserve the paint job for years to come.
The nature of a hall tree is heavy daily use by design. I took great care to properly paint a smooth finish on the hall tree, and I was very particular about what finish I used. I definitely didn’t want to ruin the smooth paint finish I worked so hard on! I needed something very durable that will keep the finish from chipping. This finish has been perfect for that.
My recommendation for the best overall sealer is this matte polyurethane by Rustoleum because of its beautiful sheen, ease of application, great durability, and no yellowing over time. It is a great general option for a sealer for a wooden kitchen table.
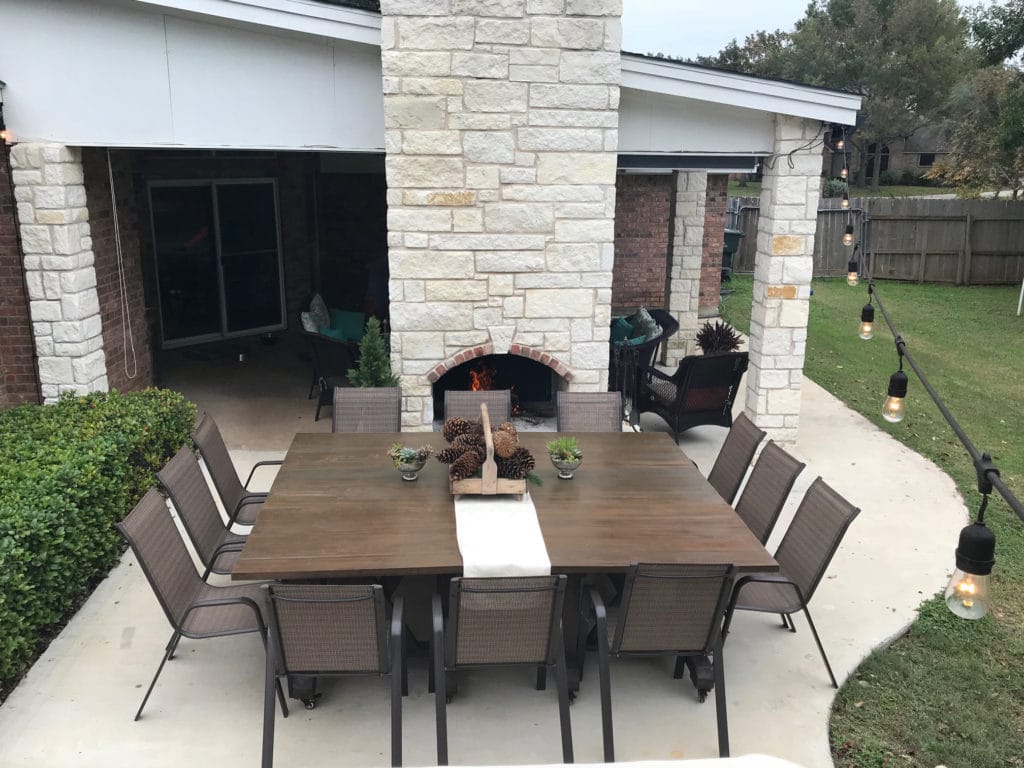
Option 2: Best Finish for an Outdoor Wooden Dining Table
Although the previously mentioned sealer is my favorite option for furniture inside, my favorite sealing product is slightly different when the piece of furniture will be outside. It is a spar urethane by Varathane.
Weather can be extremely hard on wood furniture, especially if the furniture is made from wood that is not especially hearty and dense. An example of this would be tables made out of pine. Pine is a very common building material due to the low prices compared to hardwoods. But, a downside to pine is that it is not very durable, nor does it perform well outside. Conversely, an example of wood that is great for the outdoors is cedar. By nature, cedar is rot, moisture, decay, and bug resistant.
However, I have made many outdoor patio tables that live outside and do just fine. The secret is in the sealer!
It is very important to block UV Rays on any wood furniture that will be outside. Sun exposure will quickly damage wood tables if they are not properly protected. It is also important to find a finish that helps seal the wood when temperature the changes. The finish will need to block out moisture that will naturally occur outside, whether in direct rain or not.
Because of all of these reasons, the best option for sealing an outdoor wood table is a spar urethane. I have sealed 4 different outdoor tables that I have built and sold with this, all with great results. This specific type of urethane is also used to seal the wood on boats, so you know it can withstand moisture!
In addition, I sealed our outdoor sectional with this spar urethane. This outdoor couch takes a beating by the sun daily, plus parts of it will occasionally get rained on. It has been 3 years since I finished and sealed this couch with the spar urethane, and it has held up beautifully.
In addition, I have used this sealer to finish other outdoor projects like a wooden light-up Christmas star, an outdoor wooden doormat, and a wooden garden planter for the front porch. In all cases, they have held up incredibly well when exposed to the weather.
Although it is inevitable that wooden outdoor dining tables will require some maintenance over the years, your table will last much longer if you take the time to apply a couple of coats of spar urethane. I used this on the modular expandable patio tables I built. I made these over 5 years ago and they are still holding up very well. As a huge added bonus, I have had to do zero maintenance on the finish!
I have not found a spar urethane finish in matte that I like, but the closest option is a satin finish. Even though it’s not matte, it’s a very beautiful sheen that will protect your piece well.
In fact, the tables get quite dirty after every winter and fall. In order to prepare it for use by our family in the spring and summer, I hose down the entire table (tabletop and base included!) to clean it off. Even after years of use, I can still see the water drops pool on the wooden surface because the sealer keeps the moisture out so well. I just simply wipe the hosed-down table off with a towel. I love how easy this sealer makes clean-up on our outdoor table since it makes it waterproof.
It is incredibly important to choose a type of finish that is rated for outdoor use when sealing an outdoor dining table. This spar urethane is the best option I have found.
Option 3: Best Finish for Hardwoods
There is one more product that I would like to recommend when it comes to sealing wood kitchen tables. It VERY closely rivals the polyurethane matte finish I mentioned earlier. The product is called Odie’s Oil.
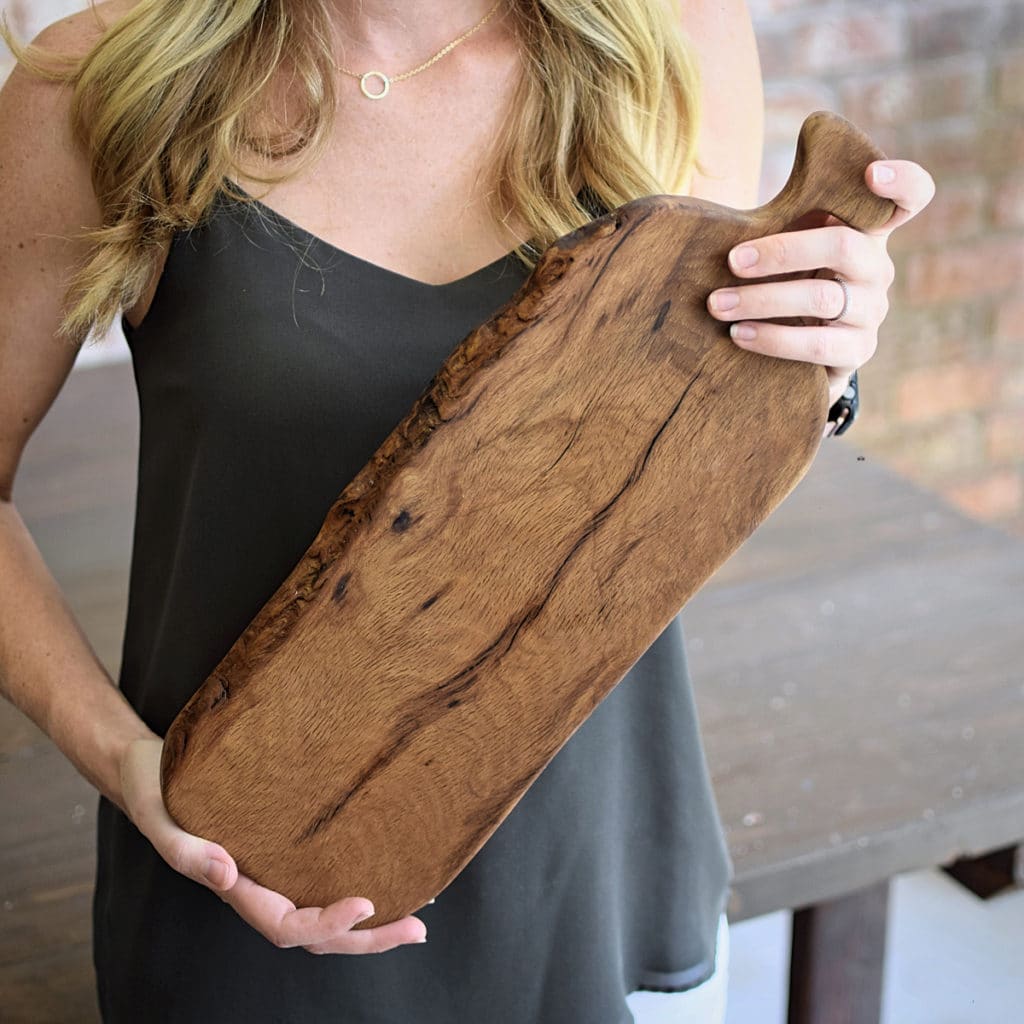
I have sealed almost every cutting board I have ever made with this sealer. Once I discovered this product, I have never used anything else to finish cutting boards.
One reason I love it so much is because it is food safe. Therefore, it is a great option for cutting boards or tables where food will be prepared. Finding a food-safe finish is incredibly important when sealing something that will touch raw food that will be eaten. Therefore, when sealing a butcher block kitchen table or cutting board, I recommend Odie’s Oil.
This finish will, however, bring out the wood tones quite a bit when it is applied, like on this end grain cutting board. This is either a positive or a negative, depending on your desired outcome.
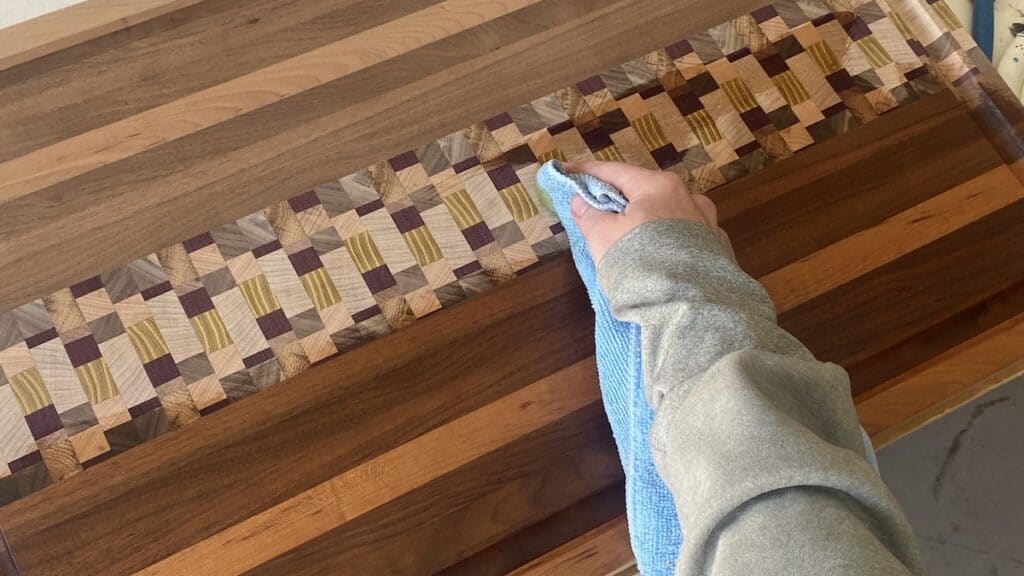
For example, for cutting boards, I use quality hardwoods and therefore, I want to bring out the natural beauty of the walnut, cherry, maple, mesquite, or whatever hardwood species I’m using. Odie’s Oil is an incredible choice for a durable finish for tables, but it is especially good for cutting boards and butcher block table tops.
However, when I refinished our wood kitchen table that has a top of wood veneer, I didn’t want to change the color of the wood veneer. I tested Odie’s Oil on it and it turned the veneer slightly too orange. However, the polyurethane created the perfect balance with the best matte sheen and a natural look. So, I used polyurethane on our kitchen table.
So, if you would like to preserve the look of the raw wood, use polyurethane. If you are sealing a wood kitchen table made out of hardwoods, I recommend Odie’s Oil in order to bring out the beauty of the natural grain.
The finish on wood after using Odie’s Oil is very durable. It guards incredibly well against stains and scratches, making a perfect protective coat for your piece.
Just a small amount of Odie’s Oil goes a very long way. So, while the price seems high for a small jar of the finish, it will last you a very long time. Odie’s Oil boasts that it has up to 20 times the coverage of other traditional finishes. It can also be used to revitalize those well-loved cutting boards, too! In some cases, it is even used to seal hardwood floors.
It smells amazing and is safe on the skin. It is non-toxic and free of solvents. Being that it is free of solvents, nothing evaporates, which means less maintenance and re-application in the future. When you seal something with Odie’s Oil, the wood absorbs everything and will stay that way for a long time.
I’m always amazed at the durability and protection this gives pieces and table tops. Given that it is not a traditional sealer like polyurethane or spar urethane, I’m consistently impressed with the protection it provides. There have been many times that stains should have happened, but they wipe right off on pieces sealed with Odie’s Oil.
How to Apply Odie’s Oil
To apply, prepare your piece. You can do this by sanding with 120 grit sand paper. I like to then spray the piece down with water. The surface will become rough again, so sand it again 1 more time with 120 grit sandpaper. The surface will be incredibly smooth when you do this.
It is important to not sand the surface too much, though. If you do, the sanding could essentially close the wood grain and it won’t properly soak up the finish. 120 grit is the finest you should sand your piece to.
Next, apply light coats of Odie’s Oil on your piece (remember, a little goes a long way!). Take the time to spread a very thin layer out. Be sure to cover the whole surface. You will then massage the oil in with a scrub mat. Next, you will buff it out with a microfiber cloth.
Generally, one coat of Odie’s Oil is enough to properly seal a piece. If the wood is especially dry to start out with, you can add another coat, however, this is rare.
I’m partial to matte finishes because this finish also creates a beautiful matte finish on hardwoods, much like the polyurethane finish from above. It truly brings out the beautiful wood tones. The wood never looks too shiny; it just has a beautiful and natural sheen with incredible protection.
So, when working on wood kitchen tables that are made from hardwoods like on a butcher block table or cutting board, Odie’s is a great option for finishing it.
Conclusion
Tables are always a fun project, especially when you are building them for your own home. Getting to enjoy a project daily is so satisfying. When so much work is put into building quality pieces of furniture on your own, it is important to take extra care when finishing the pieces. A proper and durable finish will allow many years of use on your beautiful new kitchen table.
The three best kitchen table finishes that I have found are polyurethane matte finish, spar urethane for outdoor tables, and Odie’s Oil for hardwood or butcher block-style tables. Give them a try and let me know what you think!
If you found this article helpful, be sure to check out the following articles:

Suzie Wible
Suzie has shared her knowledge for over 10 years about building furniture, painting techniques, how to build your dream home, and basic to advanced woodworking skills. Through this blog, readers will feel empowered to create a home and products they love too.