How to Paint a Dresser Black: Smooth and Durable
I’m always amazed at what a little quart of paint and some elbow grease will do to a piece of furniture. In today’s deep dive, I will look at the simple and easy steps of how to paint a dresser black.
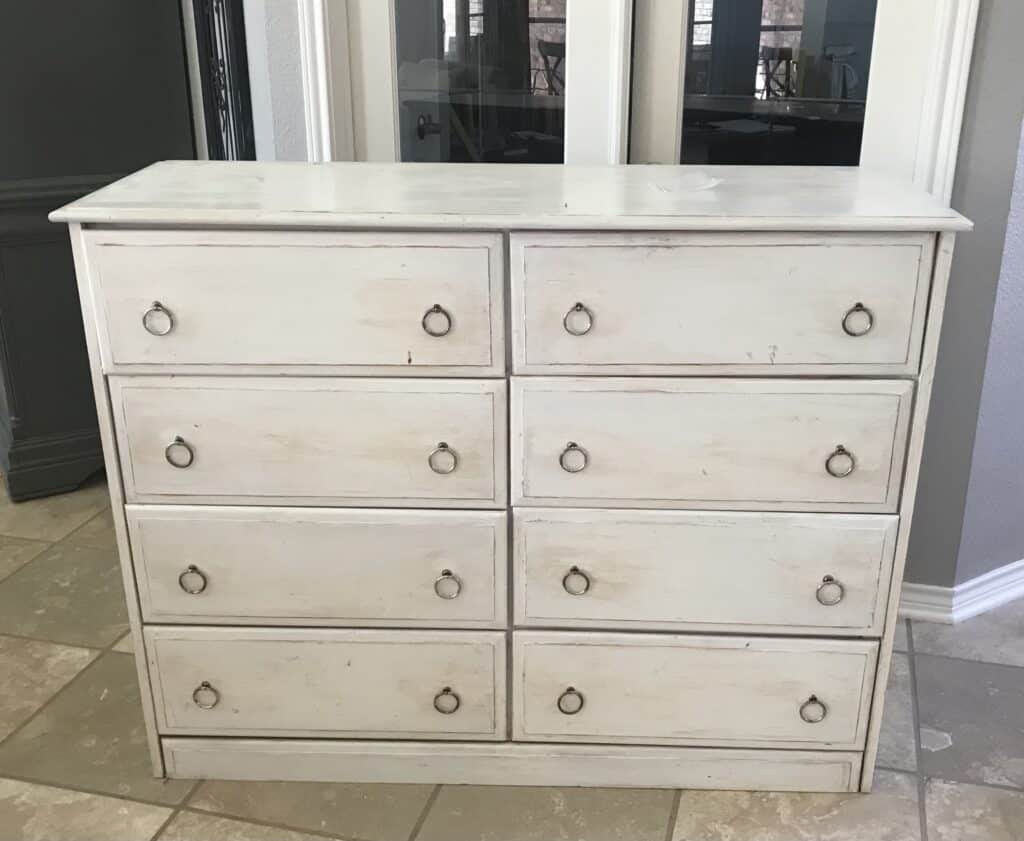
The specific dresser that I will show you on was one that we have had for years. It was in dire need of a makeover and I’m pleased to say that I’m very happy with the results!
We have now lived with this refinished dresser for a few months. It has held up beautifully to heavy and daily use.
Painting furniture black is a great DIY painting project for those just dipping their toes into furniture makeovers. One of the great things about this painting project is that you don’t have to sand the previous finish off.
I’ll say that again for the people in the back – no sanding is required to paint a dresser black! Sure, you might have to scuff up the surface a bit. But that work is minimal and produces one of the most durable finishes for a dresser. Read on to find out the details.
Basic Steps of Painting a Dresser Black
I will go into great details in how to paint a dresser black in this article. However, to give you an overview – the basic steps to painting a dresser black are:
- Clean the surface of the dresser
- Lightly scuff the whole dresser with 120-grit sandpaper. Wipe off the dust.
- Apply 2 coats of primer
- Apply 2-3 coats of paint
- Apply the top coat
And that’s it! It’s such a simple process and one that I have done countless times. Every time I have done this method, I am left with a finish that doesn’t scratch or chip and stays beautiful for years.
All that to say – I have tried to cut some steps out of this method to save some time. The finish on the painted furniture (when I cut out steps) is just not quite the same. Trust me, every step is worth doing.
But, the great part about this process is that it can be completed somewhat quickly! The longest part is just waiting for the layers to dry.
Alright, let’s take a deep dive into all of the steps for painting a dresser black.
Materials Needed for Painting a Dresser Black
Disclaimer: This site contains product affiliate links. We may receive a commission if you make a purchase after clicking on one of these links.
To complete this DIY project, gather the following items:
- Degreaser
- 120 grit sanding block
- foam roller and tray
- angled brush (but only if you have crevices or corners in your dresser that the roller can’t reach)
- primer (my favorite is Kilz)
- black latex paint
- matte polyurethane finish
- microfiber cloth
- painter’s tape
Step 1: Clean the Dresser
Depending on how old or how heavily used your dresser is, it will most likely need a good deep cleaning. I like to use a degreaser like Krud Kutter.
However, if you would like to skip buying another cleaning product, just use a degreasing soap like Dawn soap, and warm water. You might have to scrub a bit more, but this will work.
Once the product is applied and the dresser is cleaned, wipe it down with water to remove any of the degreaser or soap. If you didn’t, that would affect how the primer and paint adheres to the dresser.
Next, wipe the dresser down with a microfiber cloth. Microfiber cloths are great for deep cleaning. They pick up more than a typical terry towel. Allow the piece to fully dry.
Step 2: Prep the Dresser for Primer
The next step is to prepare the piece for the primer. In order for the primer to have something to adhere to, you need to rough up the surface just a bit. This will ensure that the primer adheres correctly to the surface of the dresser. The prep work is worth it to achieve a great finish.
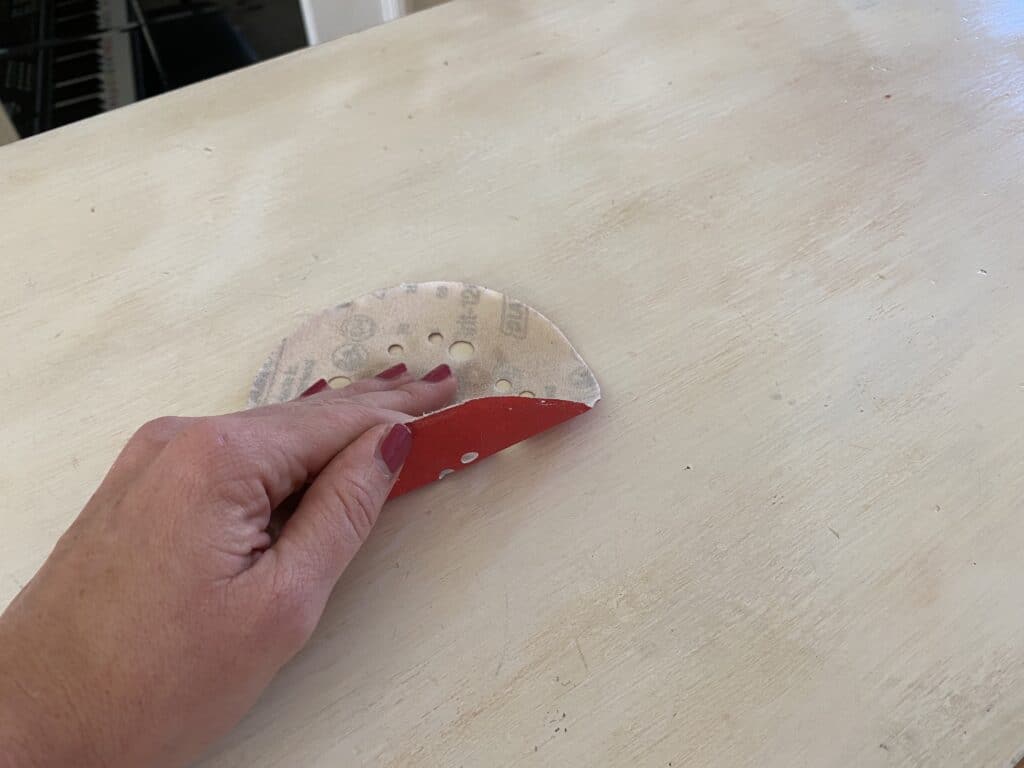
Use a 120 grit sanding block or sand paper to lightly brush over the whole furniture piece by hand.
How to Paint a Dresser Without Sanding
I know, I know…sanding is the worst. But it should be noted that you are NOT trying to remove the original finish or paint. That would actually be the worst.
And I also know that you technically are using a sanding block. But this step can be completed in about 10 minutes. You just want to run it over the whole surface of the dresser.
All you are trying to do with this step is to scuff up the surface. You shouldn’t be fully removing any of the old finish.
If you have the tools, I also like to use an orbital sander. I like this method because it is quicker, easier, and cleaner. I attach my shop vacuum to the sander to cut down on dust.
Once you have scuffed up the whole surface, wipe the dust off. You can use a vacuum for this, followed by a microfiber cloth or tack cloth. Make sure all of the dust particles are removed. If you don’t, the dust will show through the finish and make it less smooth.
Repair any Holes or Scratches
If the dresser you are working with has any damage that needs to be repaired, use wood filler to fill the damaged area. It is best to over-fill the hole. Allow the filler to fully dry and cure, then sand it smooth.
It’s also important to work in a dust-free area. I have tried to do this outside, but too much dust falls on the piece. I have had the best results finding a corner inside. Just make sure to cover the floors.
Apply Painters Tape
I don’t typically paint inside the drawers. So, I like to apply painter’s tape where the drawer faces touch the drawer box. I then paint just the drawer faces and drawer face edges.
Step 3: Apply the Primer
The key to getting a super smooth surface is to start with the right mini foam roller. I went into great detail in this post on how to get a smooth finish on cabinets in this post. So, I recommend checking that out, too.
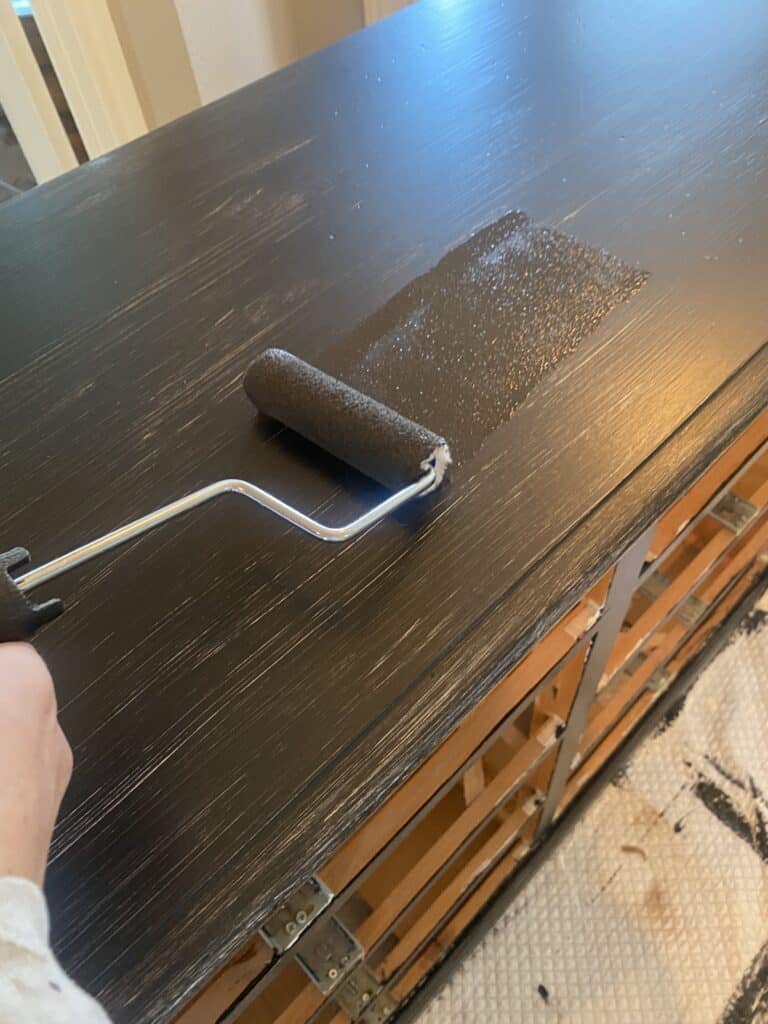
Be sure to use a super smooth finish mini foam roller. Apply Kilz primer to the whole piece using the foam roller in 1 thin coat.
The key here is to do multiple thin coats, instead of one thick coat. This will ensure that the finish comes out extremely smooth.
If there are any corners that you can’t quite reach, you can use a high-quality bristled angled brush to reach any spaces that the roller can’t reach. Allow this thin coat of primer to fully dry.
Repeat this process for a second thin coat of primer. Allow this layer to fully dry as well.
Tip: In between coats, put your roller in a plastic bag and place it in the refrigerator. When you take it out for the second coat, it will be ready to be used. This keeps it from drying out, and you don’t have to clean it between coats.
Step 4: Apply Multiple Thin Coats of Black Paint
This step is very similar to Step 3, although you are applying black paint. This step is fun because that’s when the dresser comes to life!
Best Black Paint for Wood Furniture
My favorite black paint to use is called Caviar by Sherwin Williams. I took a deep dive into why I think this is the best black color for furniture in this post, so be sure to check it out.
The amount of coats needed will be determined by your coverage of thin coats. I know I sound like a broken record here but is best to do multiple thin coats, even though it might take longer. Thicker layers will cause streaks, brush marks, and a less-smooth finish.
Using a Spray Gun vs. a Roller to Apply the Paint
Since this method produces such a smooth finish, I prefer rolling the paint on, rather than using a paint sprayer. Using a spray gun can be messy and the clean up is not fun. This is the quickest and cleanest method, and therefore, my preference.
Make sure all coats are fully dry before applying the next coat. Check the back of the paint can for drying times, as this will vary from different brands and type of paint.
Step 5: Apply the Finish
And now for the last step! My favorite matte sealer is a matte polyurethane sealer. I have used it on so many pieces like mudroom built-ins, our kitchen table, pull-out drawers in kitchen cabinets, a square coffee table, and shoe storage drawers.
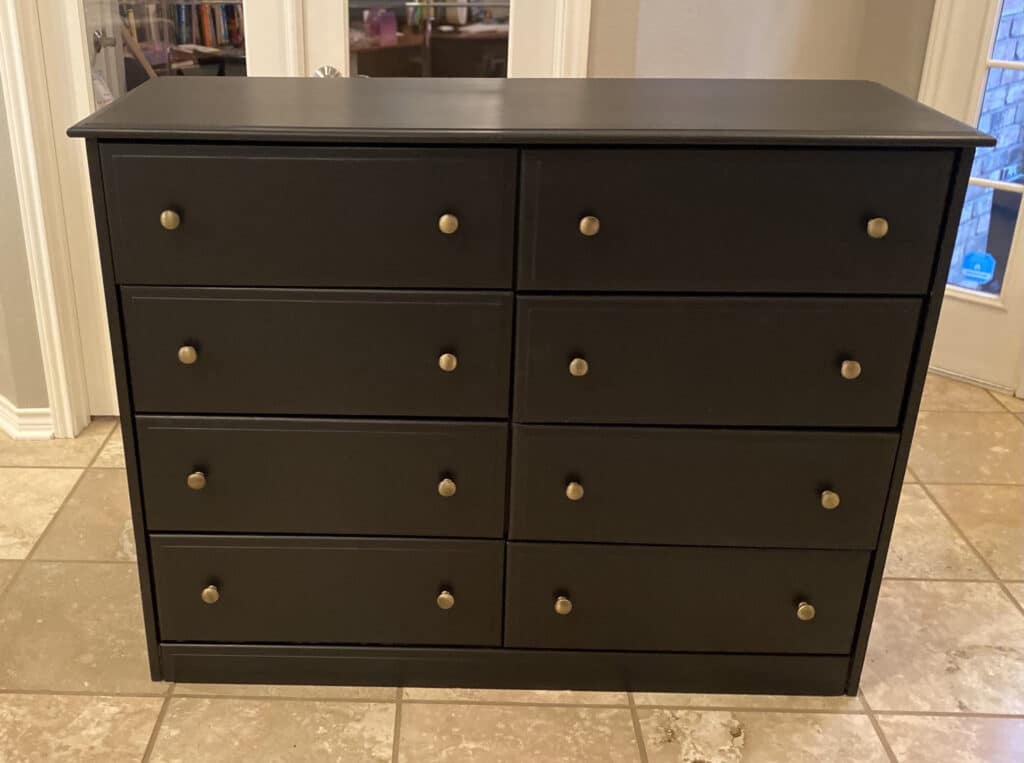
After applying this finish, you will have a beautiful matte black paint finish on your newly painted dresser. It will give you a beautiful, black Pottery Barn-like finish to your dresser.
Like previous steps, apply multiple thin coats of the sealer. Allow each layer to fully dry. The finish will be dry to the touch after just a couple hours.
However, it is best to let the dresser fully cure for around 3 days. When allowed the proper dry times, this sealer creates a very durable, beautiful, matte finish.
Before and After of DIY Black Dresser Makeover
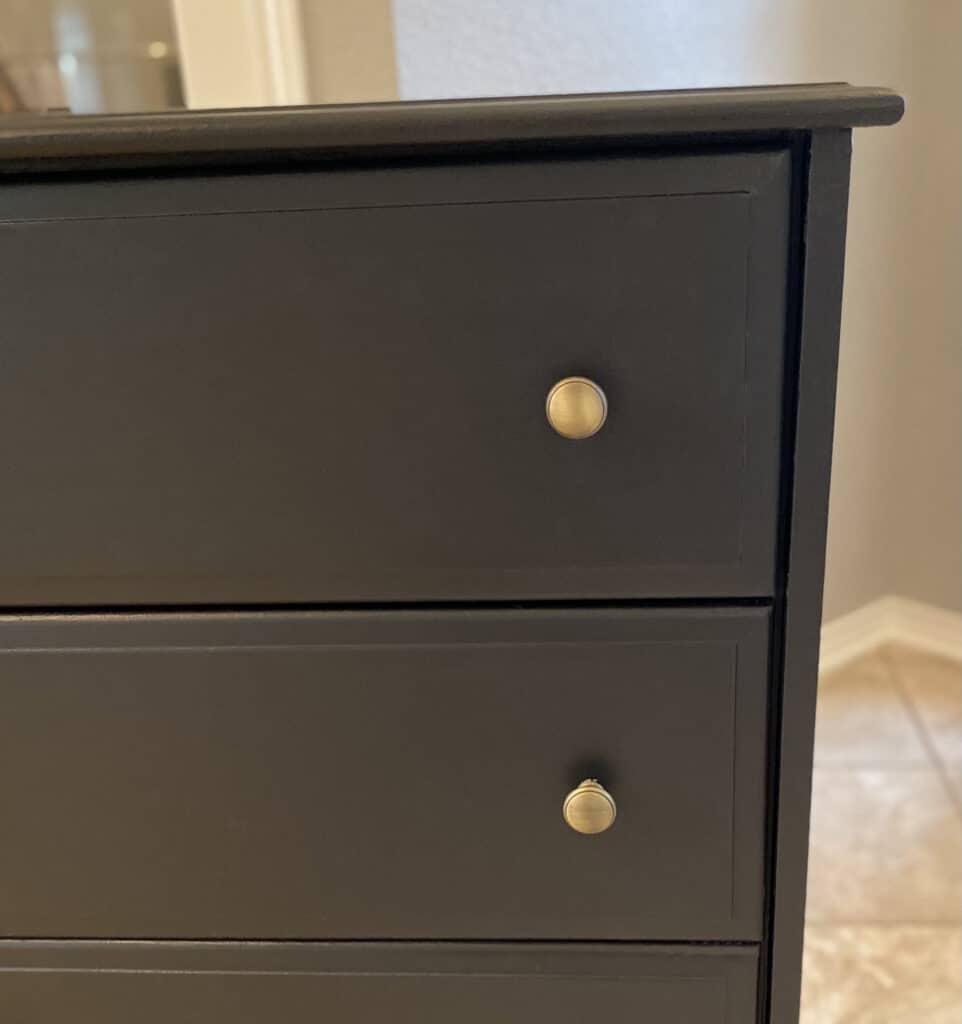
One of my favorite ways to breathe new life into old pieces of furniture (besides painting it black!) is to update the drawer pulls. I chose brass knobs and I love how they stand out against the black paint on the dresser.
Check out another view of this dresser in this post on Layout Designs for the Master Bedroom, Bathroom, and Closet!
Durable, Smooth, Beautiful Results
And there you have it – the best way to update vintage furniture and an old dresser that I have found.
This method will give your dresser the look of a black Pottery Barn dresser straight from the warehouse.
It is the best method I have found that doesn’t include having to sand the dresser before painting it. Removing a step like sanding the finish off makes this DIY project much more attainable.
Have you painted your dresser black using this method? I love to hear about it!

Suzie Wible
Suzie has shared her knowledge for over 10 years about building furniture, painting techniques, how to build your dream home, and basic to advanced woodworking skills. Through this blog, readers will feel empowered to create a home and products they love too.