How to Build and Install a DIY Kitchen Vent Hood
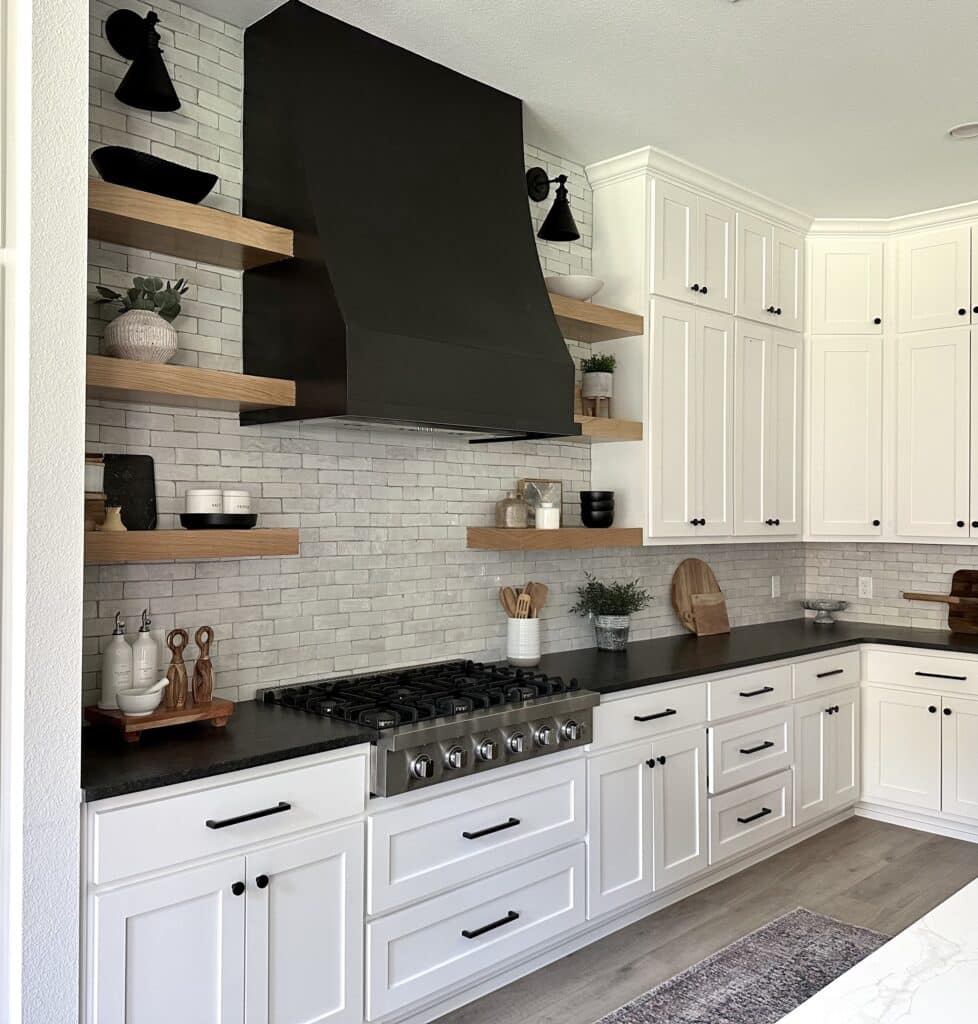
When I set out to design our kitchen for our new home build, I knew exactly what I wanted regarding a range hood to go over our gas range. I knew I would eventually paint it black and I was pretty set on the shape I wanted.
I wanted a vent hood where the front piece has a slope but one that would also took up the whole width of the range.
I asked the carpenter, trim guy, and our custom cabinet maker about building one for our kitchen. However, none of those subcontractors were sure if they could build what I had in mind.
Disclaimer: This site contains product affiliate links. We may receive a commission if you make a purchase after clicking on one of these links.
All was not lost, though. This is thanks to a company called Archways and Ceilings. Because of Archways and Ceilings, I was about to have the exact vent hood I originally had my heart set on.
Archways and Ceilings is a company that produces ready-to-assemble (RTA) range hoods and vent hoods. They have many different styles to choose from, and they had exactly what I wanted!
Disclaimer: this post is sponsored by Archways and Ceilings, but all opinions are my own.
One very cool thing about this company is that they don’t just make range hoods. They also make archways, ceilings, and wall design kits.
The premise of the company is this: you choose one of their premade designs, send the specifications for your kitchen, then they will send you all of the parts for the range hood. You will then follow simple instructions to assemble and install it. In the end, you have a custom, beautiful, DIY range hood cover.
So today, I’ll give you all the details for building your own custom DIY range hood kit for your kitchen. It all starts with a visit to the Archways and Ceilings website!
Step 1: Choose a Range Hood Design
Archways and Ceilings manufactures low cost, high quality custom range hoods that are specifically made for your kitchen. They will fit whichever range vent and ceiling height you have in your kitchen.
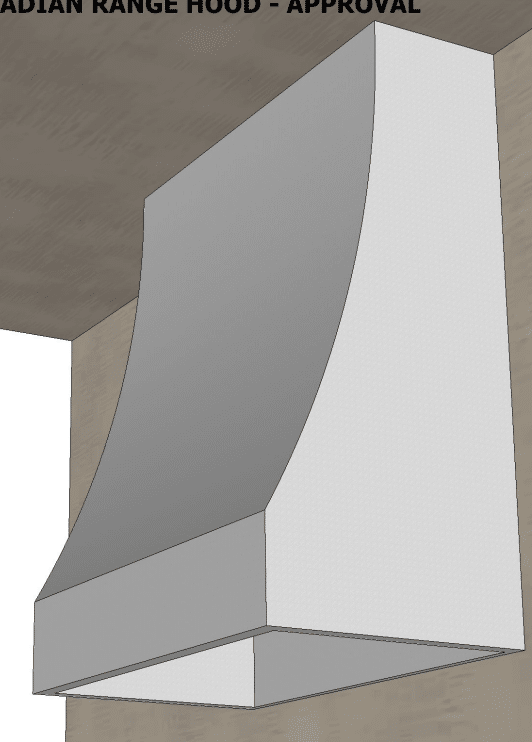
The first step is to simply enter the dimensions that will fit your kitchen the best, along with the design you like the most. I chose the Arcadian design for our kitchen. This design was exactly what I had in mind for our range hood, and I was so excited when I saw that they manufactured this design!
Once you have chosen the design you like and send your specifications, one of the first things that will happen is that you will receive an instant quote.
Being that you will do the assembling and installing yourself, you’re able to save a lot of money while getting a gorgeous new kitchen hood vent. Because every vent hood is custom, they have all different sizes available that will fit your space best.
You can also send them the exact range vent hood insert model that you have so that they can create a range hood perfectly fit for your space. The have listed all of the standard models, plus many more. You simply find the one you purchased.
Once you order your new custom vent hood, you will receive 3D CAD drawings via email within a day or so. Once you have approved the design, Archways and Ceilings will begin manufacturing the range hood. You are then provided a projected ship date!
Below are samples of the CAD drawings that I was sent.
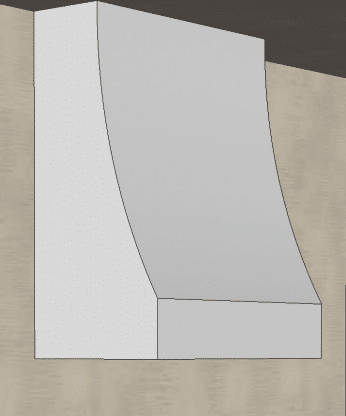

This is one thing I love about this company. They are GREAT about communication. You will know exactly where your range hood is in the process. Small things like that are so important when building a custom home in order to stay on schedule.
Step 2: Assemble and Install Your DIY Custom Range Hood
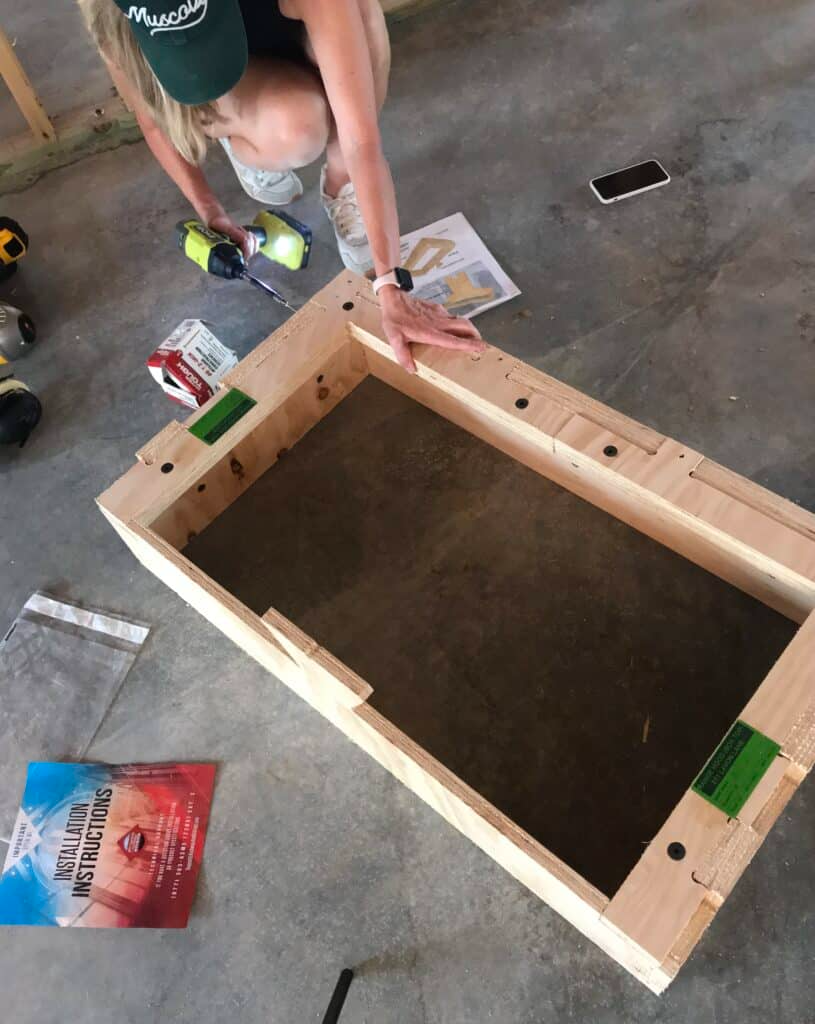
Archways and Ceilings has tons of online content that will aid in installing your new DIY range hood. It also comes with printed instructions. These instructions provided more than enough information to assembling and installing our range hood.
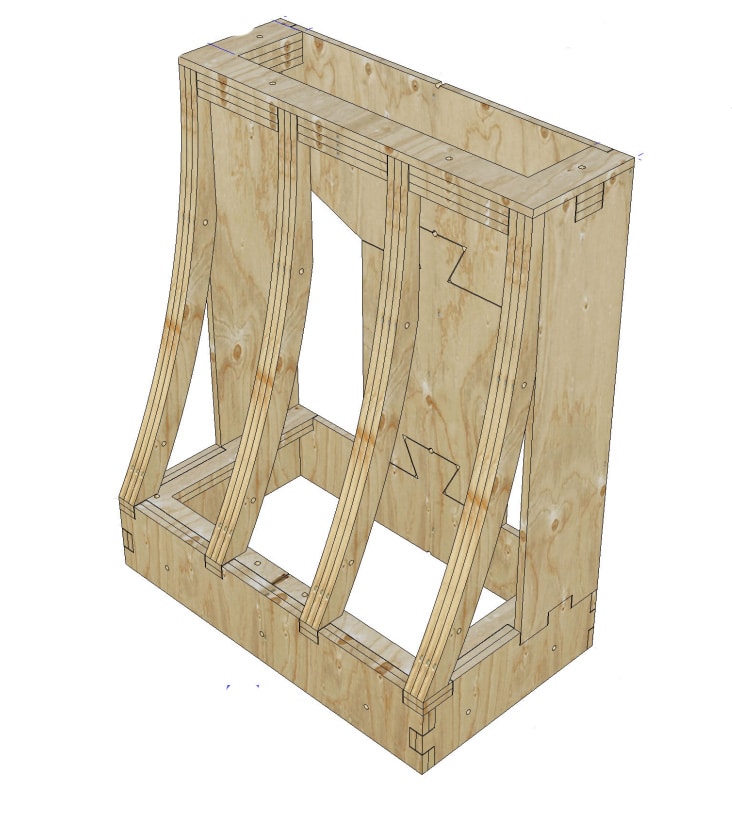
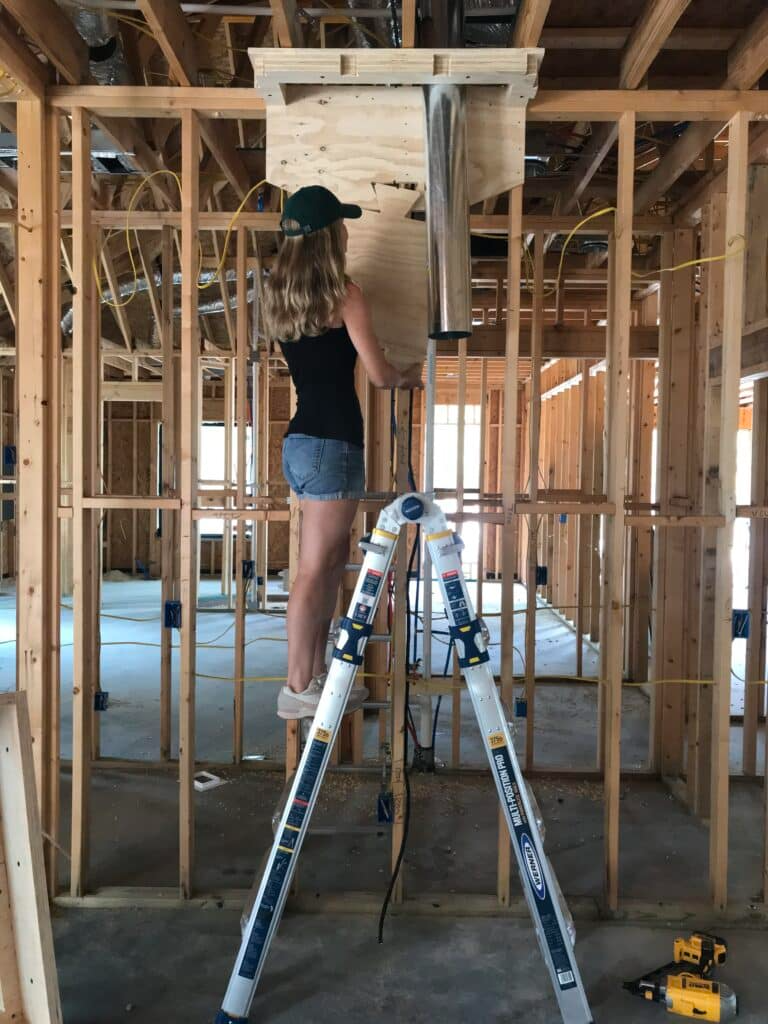
Lay out all of the pieces from the box. Assemble your tools. You will need a drill, screws, ladder, and a nail gun.
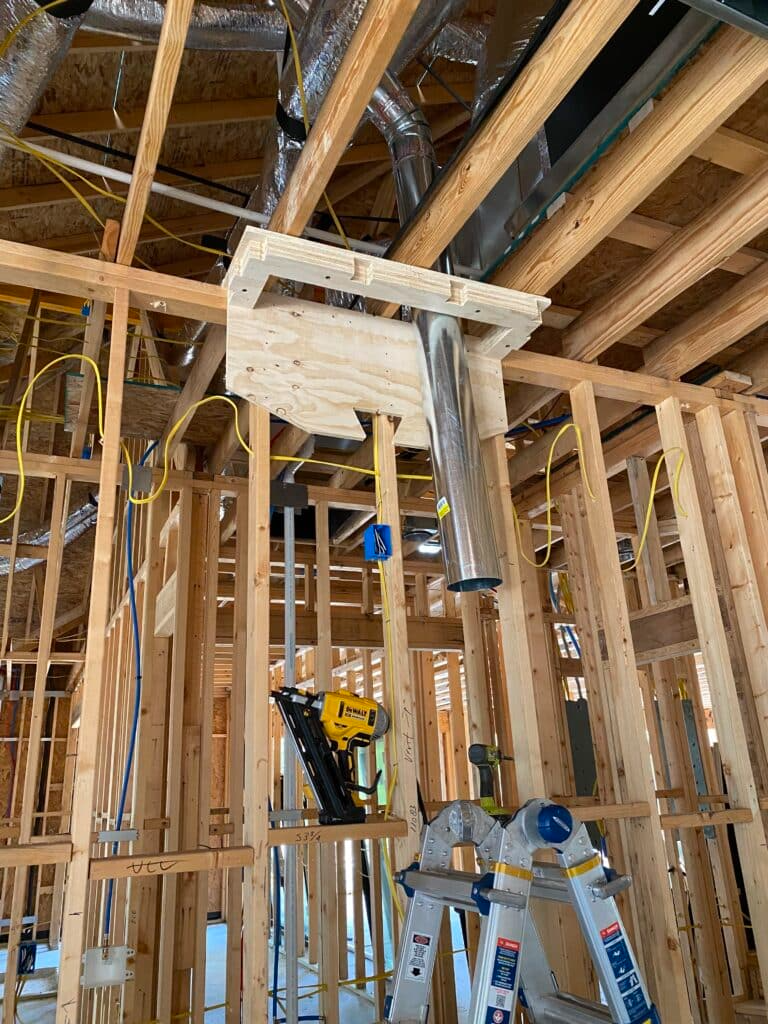
I will be installing this vent hood directly to our framing since that’s where we are in the building process. If you are doing this after the drywall is already installed, you will need a stud finder.
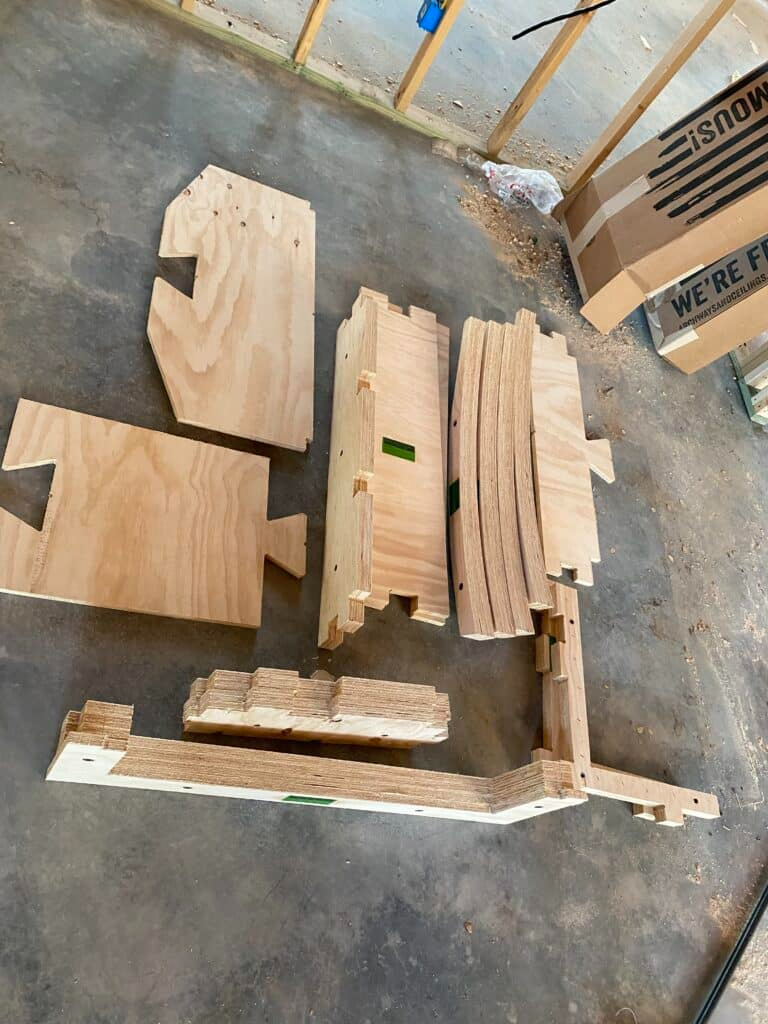
The pieces come together very easily, mostly thanks to the clear instructions that come with it.
I found it easiest to use a combination of a drill and a nail gun to join the pieces. Archways and Ceilings provides just the framing for the range hood. So, the nail holes will be covered by whatever material you choose to cover it with. For ours, we chose drywall. So, there’s no need for things like wood filler.
There is no need for wood glue either when you are assembling all of the pieces. This is because the pieces join together like a puzzle, then are secured with nails or screws. It is very secure and wood glue can be omitted.
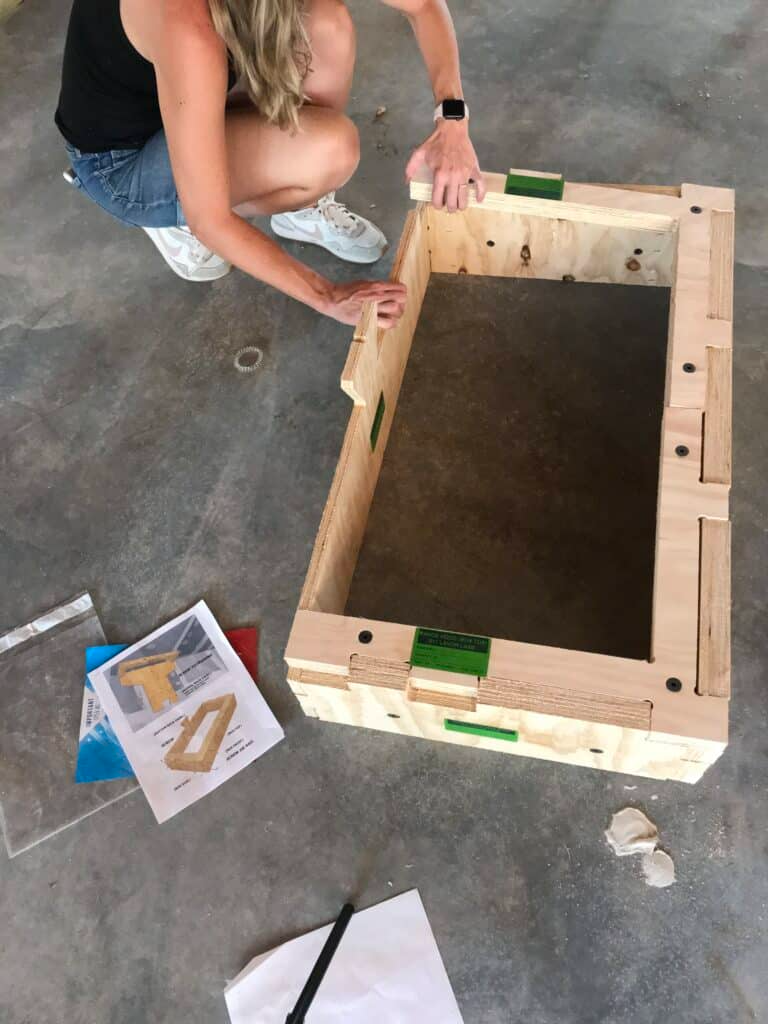
Once you have assembled what you can on the floor, like the bottom frame, you can move on to installing the wall pieces. Make sure to consult your building plans to know the exact location of the range hood.

I was able to easily assemble and install this range hood by myself in about an hour. It did not take a long time at all! This is because each piece of plywood can be nailed directly into the studs, one by one. I started with the top frame and drilled it directly to the framing of the house.
Archways and Ceilings does a great job of making each piece fit together perfectly.
The pieces go together like a puzzle, then are secured with a nail gun. I found it easiest to install the back pieces to the studs first, then add the side pieces and the bottom pieces that I assembled on the floor.
I was sure to cut a hole where the outlet for the range vent will plug into. This would be easiest to do before the side panels are installed. Having the sides of the hood open will make this step easier.
I did this by drilling a pilot hole with a drill bit, then using a jigsaw to cut the hole in the wood.

Before you know it, the whole thing will be installed! It is really like one big puzzle.
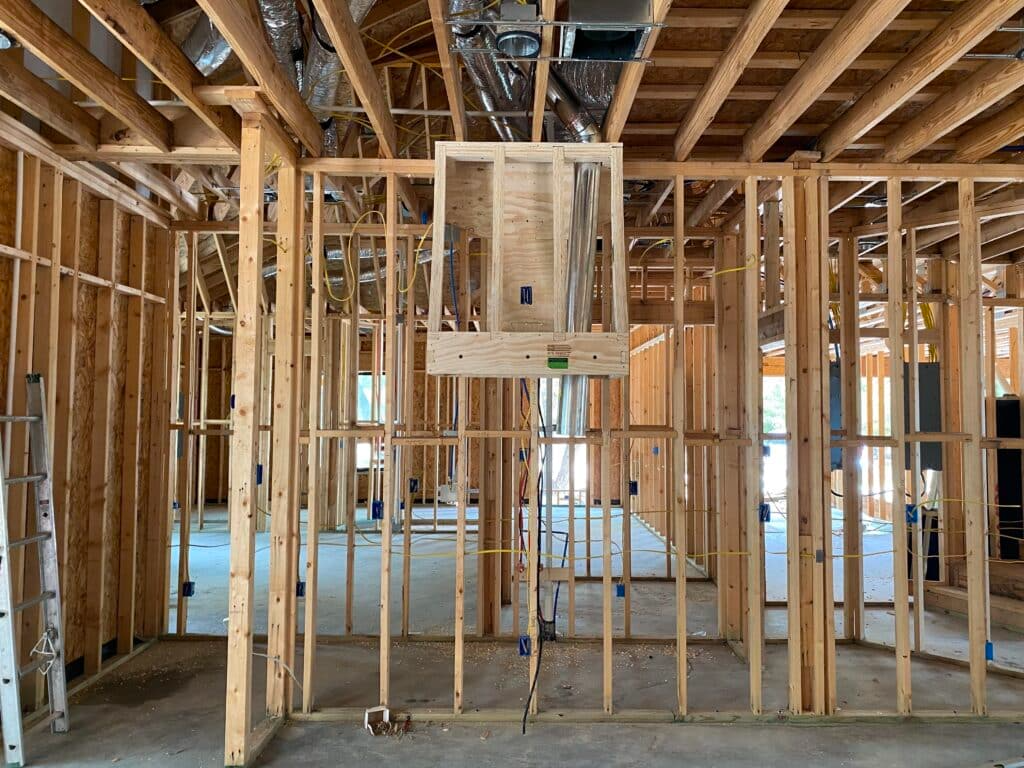
The end result is a very secure and solid vent hood.

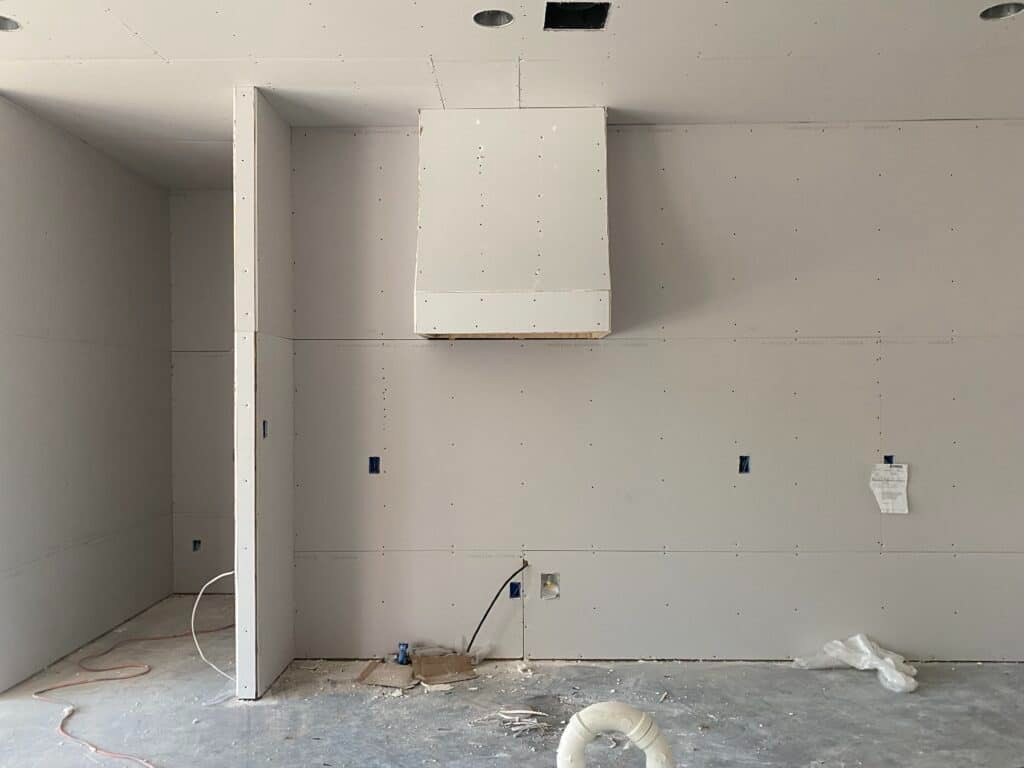
Step 3: Install Drywall Over the Frame of the Range Hood
The final step is to choose what material you want to cover the frame of the range hood in. We chose drywall.
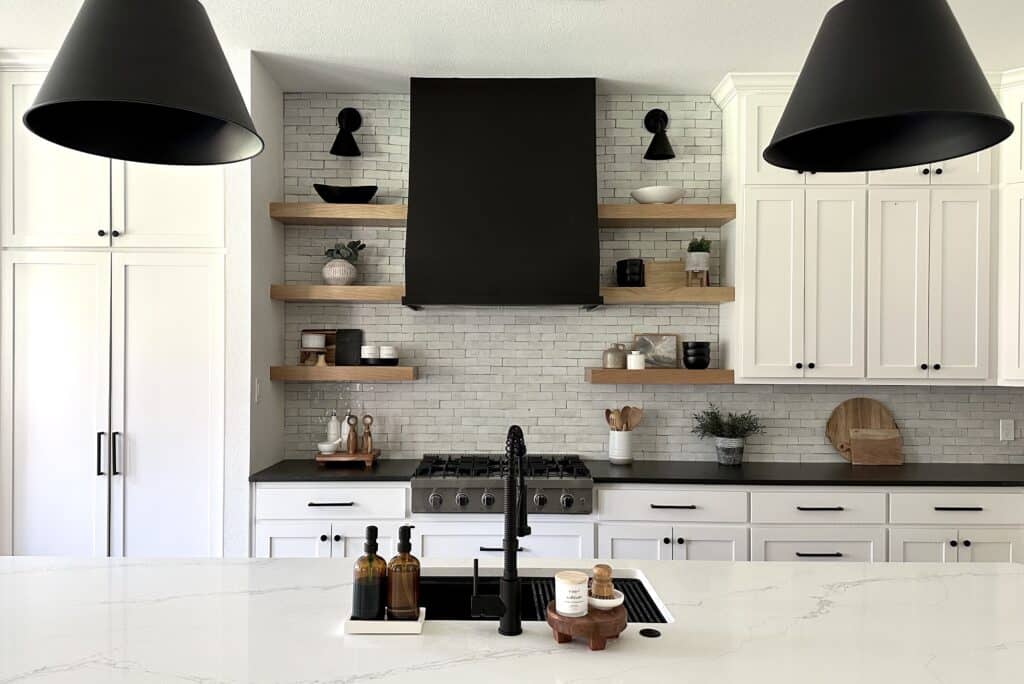
I asked our drywall guys to go ahead and cover it with drywall. I knew I wanted it to be painted black, but you could also cover it with wood/paint, metal, venetian plaster, stainless steel, wood/stain, stone, stucco, or tongue and groove, just to name a few.

Drywall was one of the most exciting stages of new home construction. You can actually see rooms, instead of seeing clear across the house!
I forgot to ask the texture installers to omit the range hood when they sprayed texture. So, I ended up skimcoating the vent hood in order for it to be smooth enough for the black paint to look good.
It was a simple fix, done with drywall plaster and a putty knife. It took about 3 coats to get the best finish, and I let each coat dry for about 12 hours. I gave it a light sanding for a super smooth finish when I was done.
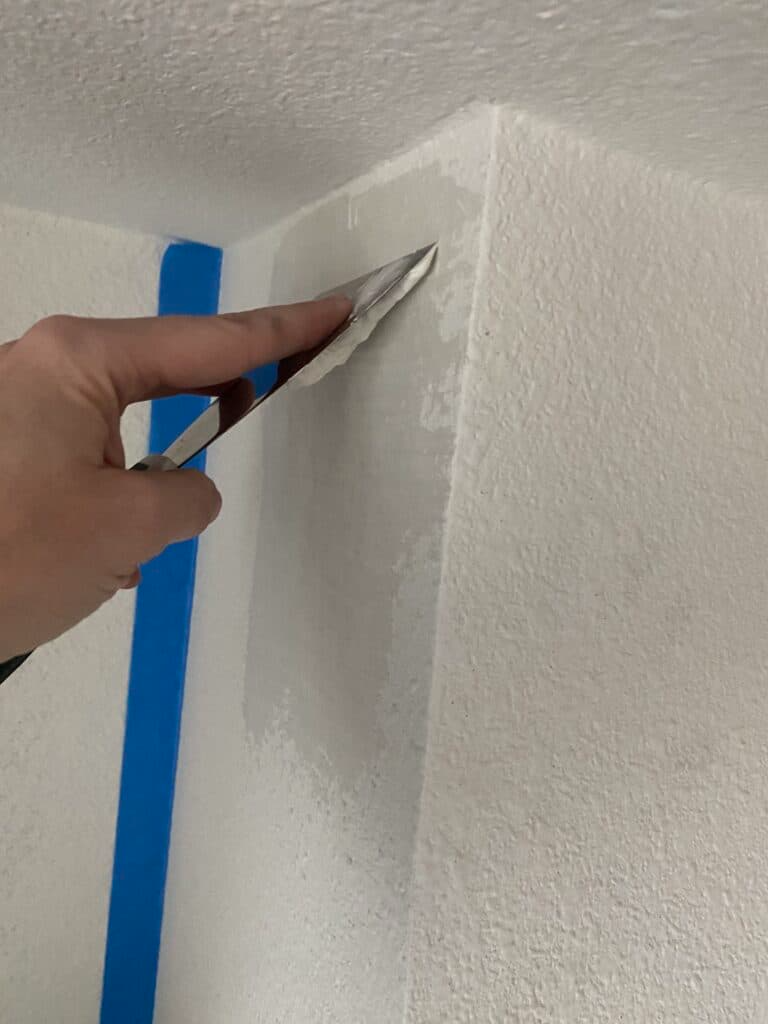
One quick wipe down for the dust and it was ready for paint!

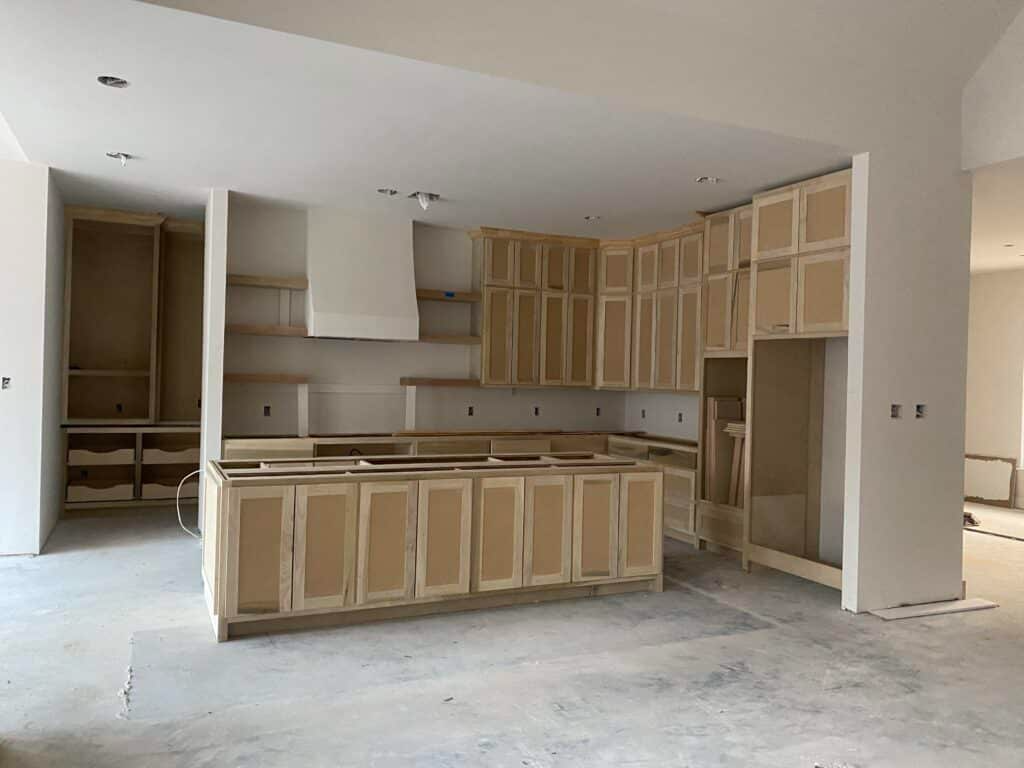
Below is our kitchen with cabinets installed and everything ready for paint. We chose to leave the open shelves unpainted since they are white oak. I wanted to soften the stark black and white of the space with a beautiful natural wood look.
The black color we chose for the range hood (and all the black in the rest of the house is called Caviar by Sherwin Williams. Find out why I think SW Caviar is the best black paint color for furniture in your home here!
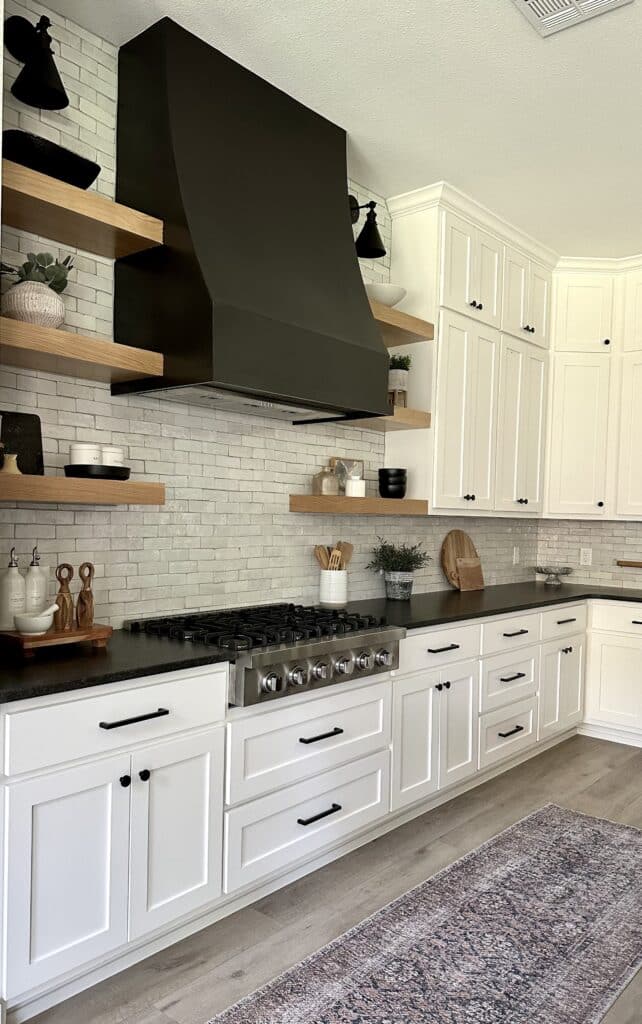
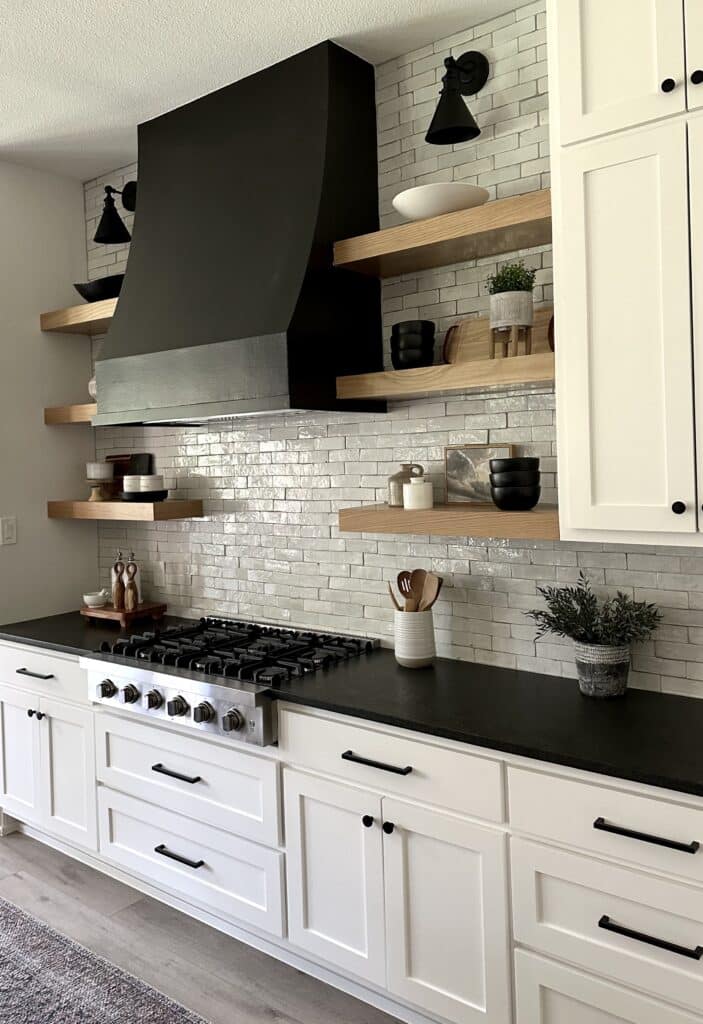
We framed out the bottom of the hood by adding a board that had a cutout the size of the vent insert. We then painted that black in order for it to match the rest of the vent

I’m so happy with how our custom range hood turned out. Thanks to Archways and Ceilings, I was able to DIY the exact hood I wanted, but in a fraction of the time. The quality is top notch and the process was made so simple. I highly recommend you checking out Archways and Ceilings for range hoods, archways, decorative ceilings, and wall kits!
If you’re building a new custom home, you might find these articles helpful:
- Kitchen Island Bar Stool Size Guide
- Best Sherwin Williams White Paint Colors for Kitchen Cabinets
- Upper Kitchen Cabinet Dimensions
- How Long Roofing Takes on Homes
- 70 Bible verses to write on the studs of your new home
- New Home Construction Checklist
- Average Cost of Custom Kitchen Cabinets
- How Long it Takes for Concrete to Set
- Kitchen Island Overhang Dimensions
- DIY Gas Fireplace Surround
- DIY Custom Closet on a Budget

Suzie Wible
Suzie has shared her knowledge for over 10 years about building furniture, painting techniques, how to build your dream home, and basic to advanced woodworking skills. Through this blog, readers will feel empowered to create a home and products they love too.